SeamCarver
Table Of Content
- Introduction
- Learning goals
- Topics Covered
- Getting Started/Logistics
- Background Information
- Pixel
- PPM P3 File Format
- MP Overview
- The Seam Carving Algorithm
- Calculate Energy
- Calculate Cost
- Find the Seam
- Remove the Seam
- Resizing an Image
- 1. Reducing the Width
- 2. Reducing the Height
- Part 1
- Assert
- Part 2
- Part 3
- Credits
Important Dates
Part 1 Due Date: Thursday 10/10 at 11:59pm (10 points) (10% point reduction if submitted within 24 hours late)
Part 2 Due Date: Thursday 10/17 at 11:59pm (10 points) (10% point reduction if submitted within 24 hours late)
Part 3 Due Date: Thursday 10/24 at 11:59pm (90 points) (10% point reduction if submitted within 24 hours late)
Introduction
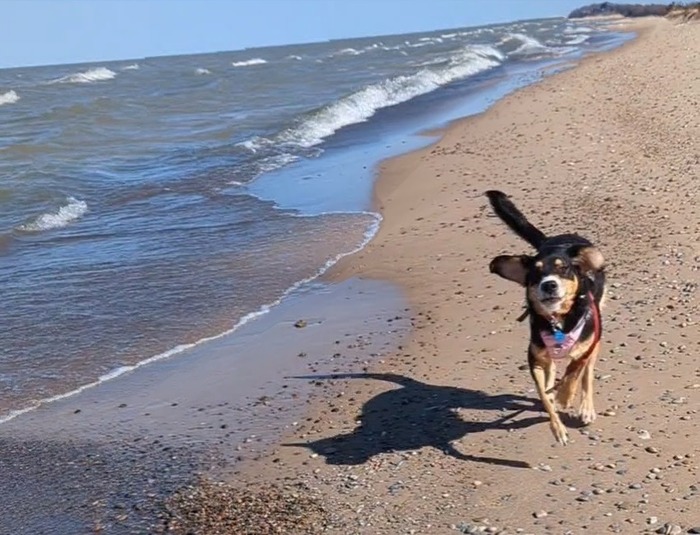
In this MP you will create a program that can resize an image using the seam carving technique. Let me explain using a picture of my dog, Maymay.
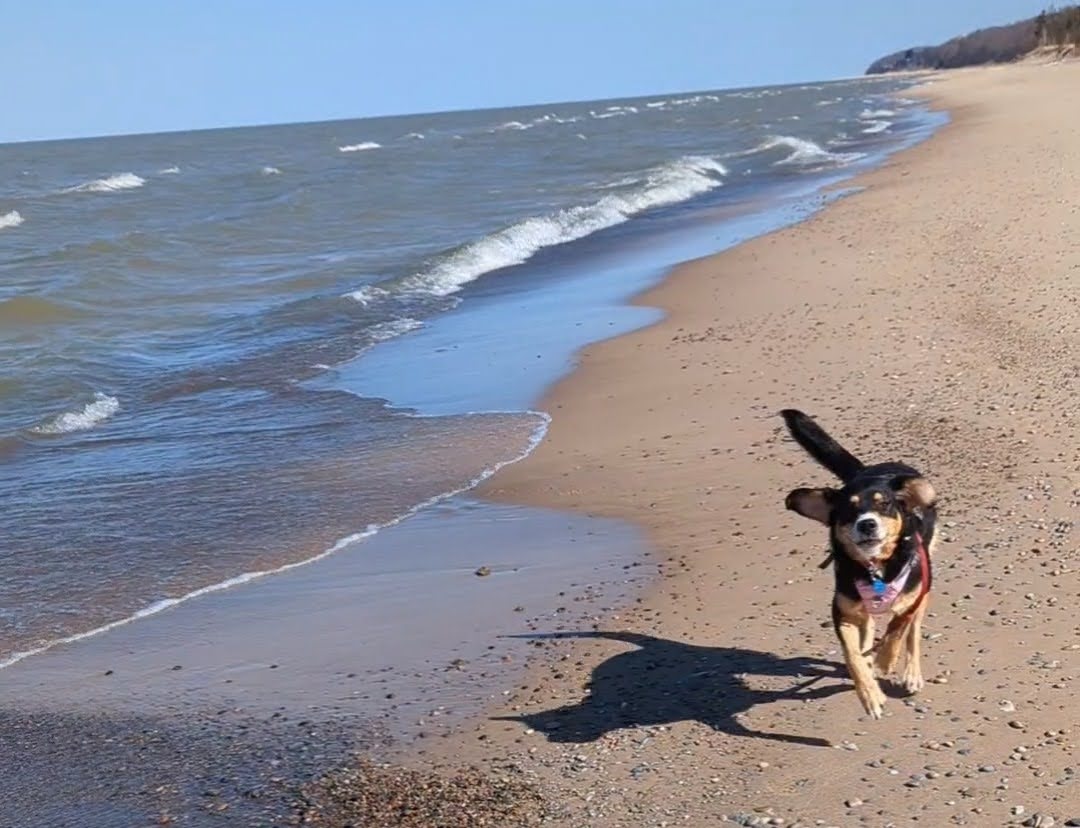
I want to zoom in on my dog! However, just cropping the image removes other important parts of the picture I want to keep, like the skyline and water.
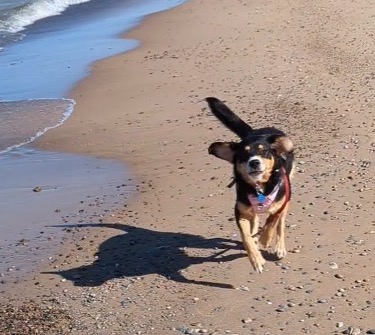
So instead I can use the seam carving algorithm to remove the less interesting parts of the image. This way I shrink the image while keeping more important parts, like Maymay <3.
Learning goals
- From simple specifications create a complete, functioning project.
- Become comfortable working with classes and 2D data structures.
- Design a readable and reusable solution through functions and testing.
Topics Covered
2D vectors, classes, command line arguments, strings, and testing.
Getting Started/Logistics
Start up the docker container from the docker app.
We recommend creating a CS128 folder to keep all assignments for this semester. Download the starter files onto your computer by visiting this link, Starter Code. Unzip the folder with the starter files in the CS128 folder you created. Open up a new window of VS Code. Click "Open..." and navigate to the folder called "student-seam-carver-main". Click "open".
When you are done with each part, submit on Prairie Learn via the autograder, linked above for each part.
Background Information
Before we get started, let's make sure we are all starting on the same page!
Pixel
A pixel is a small colored square. Many pixels together create an image. A color can be represented in RGB using three numbers each ranging from 0-255. The first number captures how much red is in the color, the second how much green, and the third how much blue. All the colors used on your computer can be represented using this format. We will use RGB pixels in this MP.
PPM P3 File Format
For this MP we will use the PPM P3 file format for all the images. The PPM P3 format is easy to work with and lets us easily manipulate an image. The files end with a .ppm extension and always begin with the following header:
P3
width height
255
Replacing width and height with the actual values for that image.
After the header are all the pixels in the image. Each pixel is just its three RGB values. Here is a small example PPM P3 file:
P3
2 3
255
30 30 39 0 0 0
255 255 255 30 60 60
0 1 0 200 200 24
PPM files can be viewed like normal images using various online and built in software. For example, on a Mac, they can be viewed in the preview app. When looking at a PPM file in a text editor you can see the format noted above.
I have included many PPM P3 files for you to use with the starter files in the sample_images directory. However, feel free to also create your own!
I have had success using the magick program on my Mac to convert jpg files to the PPM P3 format. I recommend
reducing the size of the jpg before converting to PPM to speed up processing time.
MP Overview
In this MP you will create code that reads in an image file and a desired width and height. Note the new desired width and height needs to be the same or smaller than the original width and height. The program will then remove seams (a contiguous series of pixels) from the image until it is the desired width and height. Finally, it will save the edited image to a new image file.
This MP uses the Image class along with the Pixel struct to represent and store images. In driver.cc you will create an instance
of the Image class and call various functions you defined in image_processing.cc to seam carve the image.
This project is split into three parts across three weeks.
Part 1 has you implement and test the Image class as well as the RotateLeft and RotateRight functions in image_processing.cc. 10 pts (Due Thursday 10/10 at 11:59pm) (10% point reduction if submitted within 24 hours late)
Part 2 has you implement and test the rest of the functions in image_processing.cc. 10 pts (Due Thursday 10/17 at 11:59pm) (10% point reduction if submitted within 24 hours late)
Part 3 has you implement the driver for the program. 90 pts (Due Thursday 10/24 at 11:59pm) (10% point reduction if submitted within 24 hours late)
Each part builds on the previous part(s). Feel free to work ahead!
The Seam Carving Algorithm
Below is a simplified explanation of the seam carving algorithm with all the information you need to complete the MP. If you would like to get a more in-depth understanding, please see the research paper by Avidan and Shamir from 2012 that first introduced this idea, Seam Carving for Content-Aware Image Resizing.
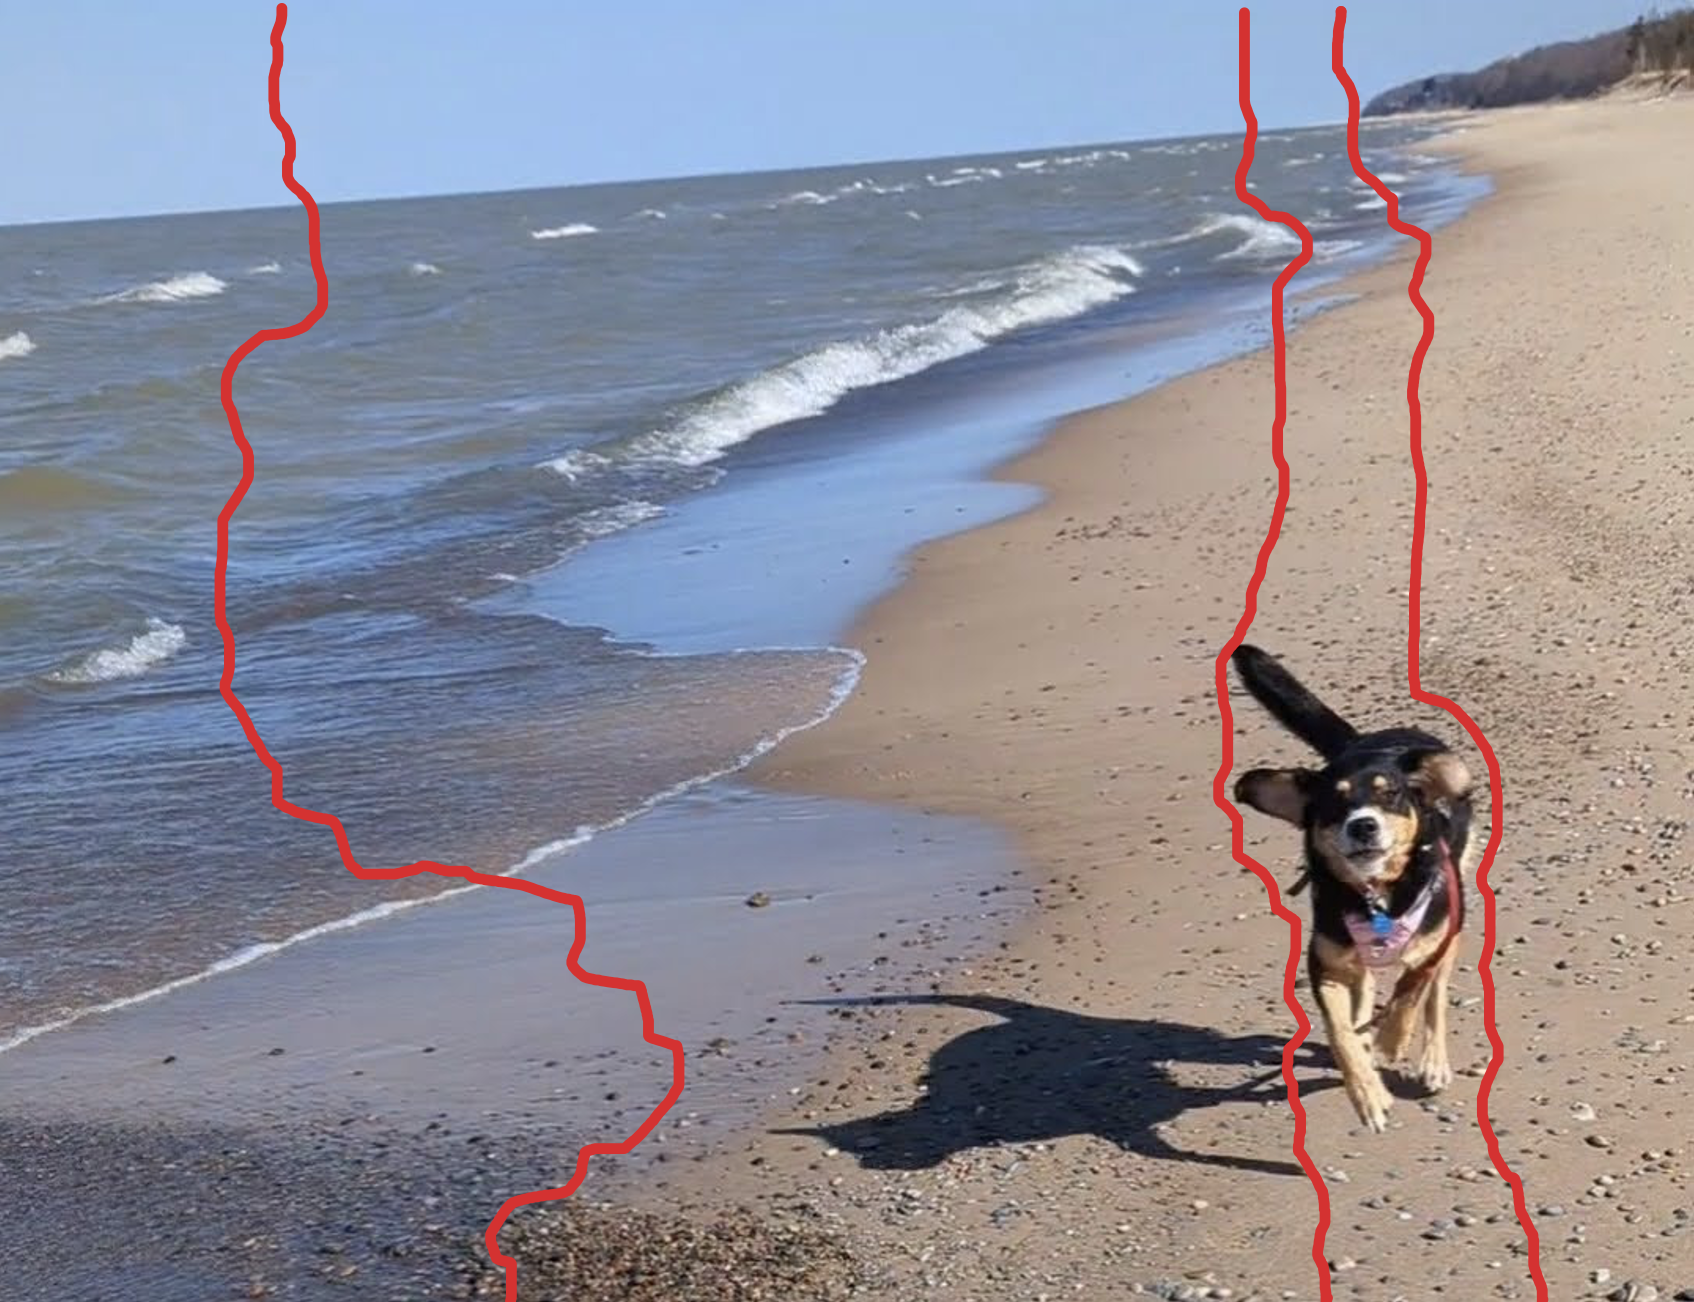
Seam carving works by identifying unimportant paths of pixels across an image, aka seams. For this MP, we will focus on vertical seams. Below is a visual representation of what 3 random vertical seams could look like (the vertical red lines).
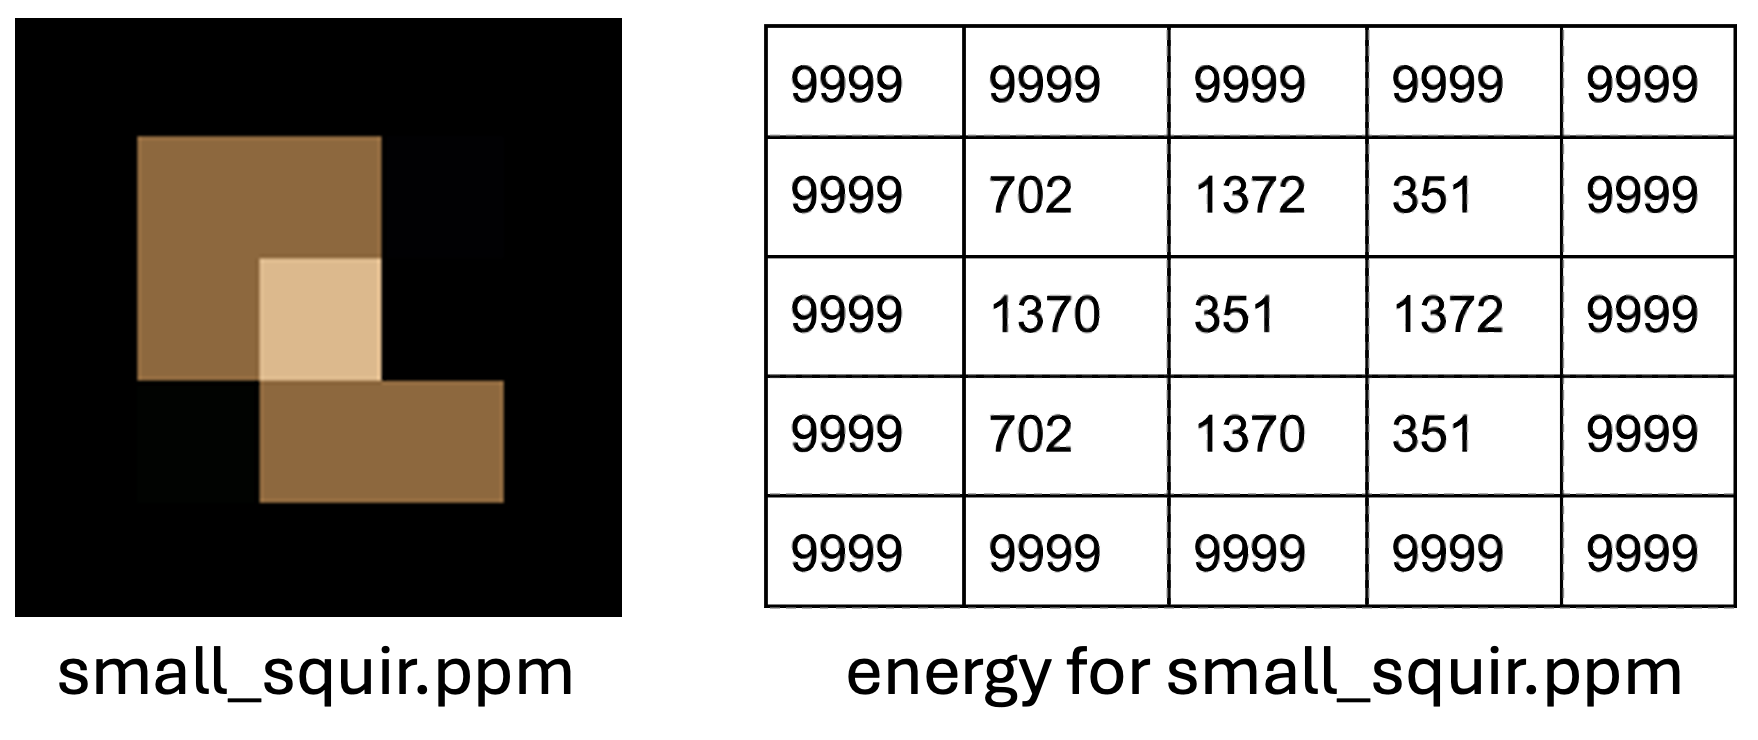
Calculate Energy
To find unimportant seams we need to find unimportant pixels. A pixel is unimportant if it does not contribute to the main subject of the image. This is hard to define! To approximate this, we use the energy of the pixel. The energy of a pixel within an image is the sum of the squared energy between its north(N) and south(S) neighbor and its east(E) and west(W) neighbor. A high energy means a pixel's neighbors have a high contrast with each other and so it is probably important to the subject of the image.
You will write a function in the image_processing.cc called CalculateEnergy(). This function will calculate the energy of each pixel in the image and return it as a 2D vector.
Below is the formula for calculating the energy of a pixel:
energy(inner pixel) = SquaredPixelEnergy(N, S) + SquaredPixelEnergy(E, W)
energy(border pixel) = kHighEnergy
The function SquaredPixelEnergy is given and implemented already for you in pixel.hpp and pixel.cc. To avoid carving the edges of the image, we will use the constant kHighEnergy for all border spaces.
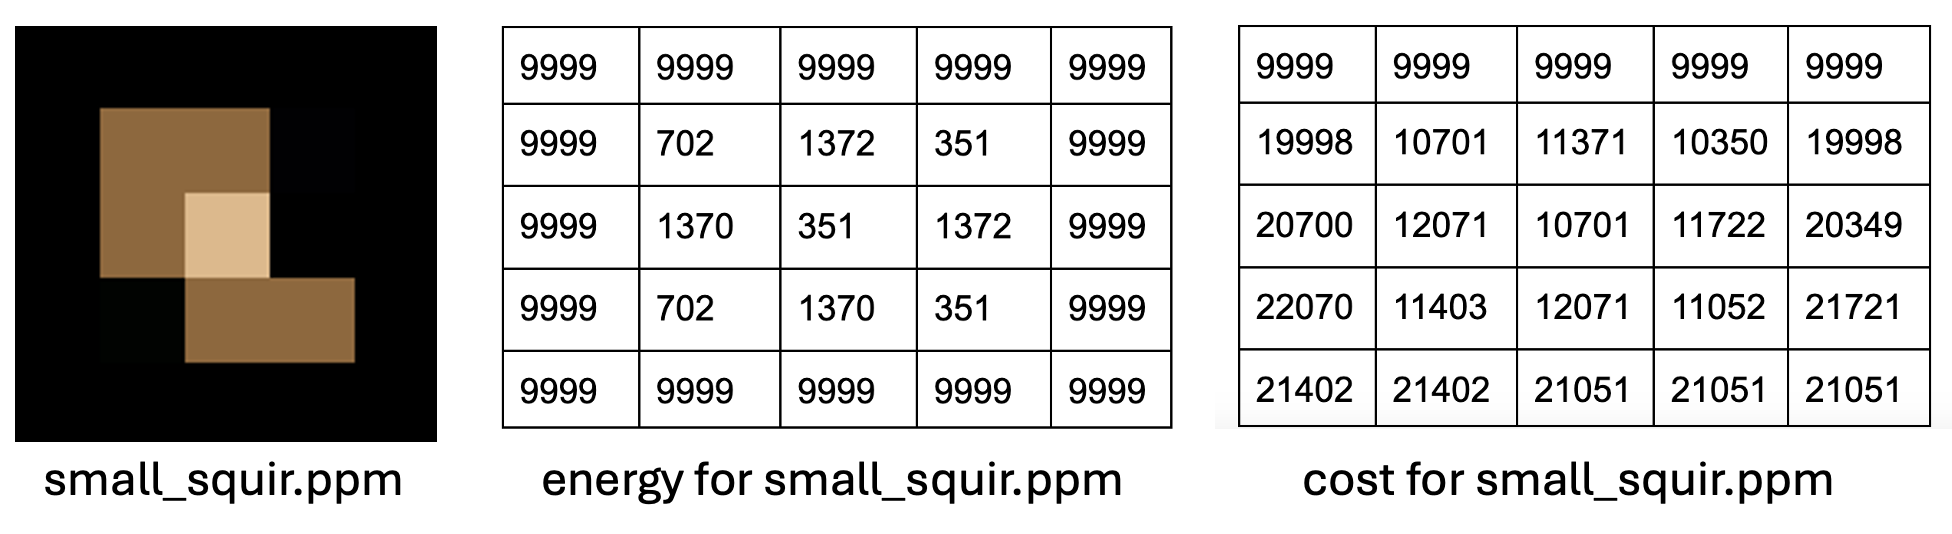
Calculate Cost
We now want to find a seam or path that goes through the least amount of energy. To find this, we first calculate the minimum energy cost of reaching a particular pixel. In other words, what is the least amount of energy that the seam needed to pass through to get to this specific pixel (from the top down). Once we have calculated this for every pixel in the image, we can start on the bottom row and work our way up following the path of least cost.
To calculate the minimum cost of a pixel, we add its energy to the minimum cost of getting to that pixel. There are either 2 (for border pixels) or 3 (for inner pixels) pixels the path could be coming from. In order to start this algorithm we set the top row cost to the energy values of those pixels.
cost(0, col) = energy(0, col)
cost(row, col) = energy(row, col) + min(cost(row-1, col-1), cost(row-1, col), cost(row-1, col+1))
*If it's a border pixel do not consider pixels off the end of the image
The recommended approach for calculating the minimum cost of each pixel is to start at the top row. Initialize all the values in that top row with their energies and then
work your way down using the formula above. Fill in a 2D vector with the values at each step in the CalculateCost function and return that 2D vector at the end.
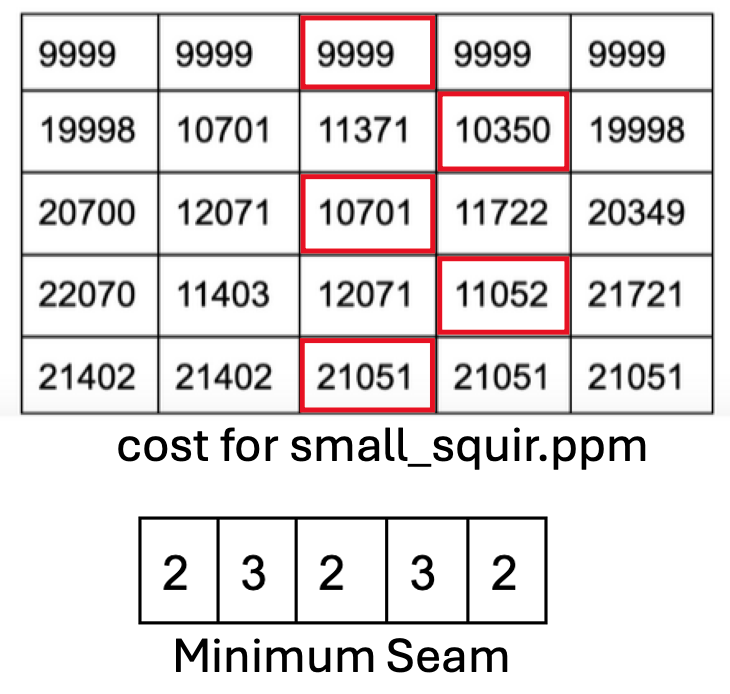
Find the Seam
After calculating the energy followed by the cost, it is time to find the least important seam. In this MP, we will only be finding vertical seams. A seam is represented by a vector.
To find the seam, start at the bottom of the cost 2D vector and find the smallest cost value. That will be the starting point of the seam. From there, trace your way back up the image along the path of the smallest cost values. Only consider elements above and 1 to the left, above and 1 to the right, and straight above (if they don't go off the end of the image) above the current cost value. At the end, you will have a vector the size of the height of the image. Each element indicates which column the pixel of the seam is in for that corresponding row. For example, if the 1st element in the seam vector, spot 0, has the value 2, that means the seam starts at row 0 at column 2. If the 4th element in the seam vector, spot 3, has the value 3, that means the seam passes through row 3 at column 3.
When implementing FindVerticalSeam be careful to handle the case where the seam is at a border value. If there is a tie, use the leftmost pixel.
Remove the Seam
Once you have found the minimum seam all that is left is removing it from the image. I recommend using the RemovePixel function from the Image class.

Resizing an Image
Let's put it all together to change the size of an image. In Part 3 you will use the Image class and functions from image_processing.cc to achieve the following behavior in driver.cc:
1. Reducing the Width
- Find vertical seam
- Calculate energy
- Calculate cost
- Find least important seam
- Remove pixels from image that are in the seam
- Repeat until desired width
2. Reducing the Height
- Flip the image to the left by 90 degrees
- Apply the "Reducing the Width" algorithm as many times as necessary
- Flip the image to the right by 90 degrees
Note: Always reduce the width fully before reducing the height.
Part 1
In this part, you will complete the Image class and the RotateLeft and RotateRight functions. Below are the required functions for this part:
- 2 Image constructors
Image::SaveToFileImage::WidthImage::HeightImage::GetPixelImage::SetPixelImage::RemovePixelRotateLeftRotateRight
There are only a few tests given. It is up to you to expand the tests/tests_image.cc file by adding your own tests to verify your Image code is working.
Additonally, it is up to you to expand tests/tests_image_processing.cc file by adding tests for the Rotate functions.
You may find it helpful to use functions from includes/tests_helpers.hpp and defined in src/tests_helpers.cc when writing your tests. You can also use
images found in the tests/test_images directory in addition to making your own ppm files.
To compile and run your tests_image.cc code put the following into the terminal:
make tests_i
./bin/tests_i
To compile and run your tests_image_processing.cc code that tests the rotate functions, put the following into the terminal:
make tests_ip
./bin/tests_ip
Assert
Many Image member functions ask you to use assert to check the REQUIRES clause. Assert is a function that ends your program if it evaluates to false. This makes your code easier to debug then if your program proceeded with undefined behavior. For example, I could do the following,
#include <cassert>

// REQUIRES: x is not 0
// MODIFIES:
// EFFECTS: divides 10 by x
void Func(int x){
   assert(x != 0);
   10/x;
}
Part 2
In this part, you will complete the image processing functions. Below are the required functions for this part:
CalculateEnergyCalculateCostVerticalFindVerticalSeamRemoveVerticalSeam
There are only a few tests given. It is up to you to expand the tests/tests_image_processing.cc file by adding your own tests to verify your code is working.
You may find it helpful to use functions from includes/tests_helpers.hpp and defined in src/tests_helpers.cc when writing your tests. You can also use
images found in the tests/test_images directory in addition to making your own ppm files.
To compile and run your tests_image_processing.cc code put the following into the terminal:
make tests_ip
./bin/tests_ip
Part 3
In this part, you will complete the driver portion of the MP. This is the code that will call the functions you wrote in the previous parts in order
to seam carve an image (see the Resizing an Image section above). You will write this code in the src/driver.cc file. Please create helper functions
to avoid having a main function over about 40 lines. I recommend writing those helper functions directly in the driver.cc file.
Your driver code should use exceptions to handle the following errors in this order:
- If the file cannot be opened, print ONLY "File could not be opened." with a newline and end the program.
- If the width is bigger than the original image, print ONLY "Width is too big. We cannot currently grow the image." with a newline and end the program.
- If the height is bigger than the original image, print ONLY "Height is too big. We cannot currently grow the image." with a newline and end the program.
In the driver, you will have to read in the command line arguments to read in the <image_name> <new_width> and <new_height> in that order. If there are the wrong number of command line arguments, you should print ONLY "The format is, <image_name> <new_width> <new_height>" with a newline and end the program.
The new file the code produces should be called the <base_input_file_name><new_width>x<new_height>_actual.ppm
<base_input_file_name> means no folders or '/' characters.
To compile the driver, use make exec
For example, if I ran the following:
make exec
./bin/exec sample_images/cs128_staff.ppm 350 400
This would take about 1-2 minutes to run and produce the following image named, "cs128_staff350x400_actual.ppm"
To test your code for this part we have given you multiple expected image files in the tests/expected directory.
Each is named based on the new dimensions after being carved. For example, mini_squir10x16.ppm is mini_squir.ppm carved to 10x16.
To check your carved image matches the expected use the diff command in the terminal.
diff <file1.ppm> <file2.ppm>
Replacing <file1.ppm> and <file2.ppm> with the actual file locations and names. If nothing prints, that means the files are identical.
Credits
Written by Jule Schatz 2024 with help from Georges Durand, based on a project by Josh Hug and code by Kevin Wayne and Maia Ginsburg (Princeton).